#raspberry pi for beginners
Explore tagged Tumblr posts
Visit Tumblr Blog
Explore Tumblr blogs with no restrictions, modern design and the best experience.
Last Seen Tumblr Blogs


Fun Fact
When “GIF” was named word of the year in 2012, Oxford Dictionaries U.S.A. credited Tumblr for pushing the word.
Text
0 notes
Text

Home Automation Electronics Kit
Discover the fascinating world of smart home technology with this interactive learning kit, designed to spark curiosity in young minds. Combining the versatile ESP32 board with engaging story-based activities, this kit immerses children in the exciting world of home automation. Packed with a variety of sensor modules and programming tools, it allows young learners to build, experiment, and protect a smart home while honing essential STEM skills. Perfect for nurturing creativity and problem-solving abilities, this hands-on kit offers a fun and accessible introduction to the future of technology. Ready to dive in? Click the link to learn more and make your purchase!
#Home Automation Electronics Kit#Python and AI learning kit#Raspberry Pi AI kit#AI-powered electronics projects#AI learning kits#Robotics kit for beginners#Build your own AI assistant#DIY AI learning kit#Machine learning for beginners#Generative AI learning projects
0 notes
Text
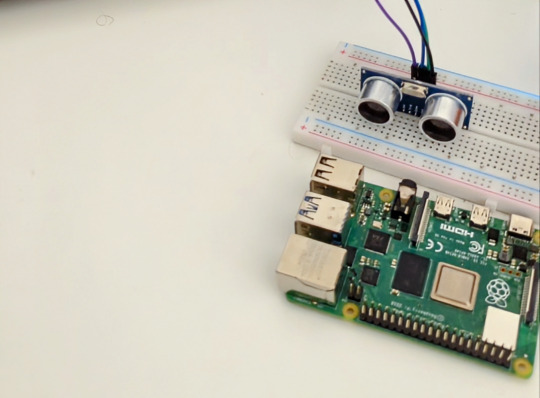
A Guide to Measuring Distance with HC SR04 Sensor Using Raspberry Pi
Raspberry Pi allows you to get creative with programming and build stuff with it. With the Pi, you can make your code come alive. This is the reason I love working with Raspberry Pi and today, we will be talking about one cool Raspberry Pi project: measuring distance using an HC SR04 sensor. We will discuss what an HC SR04 is and the principle on which it functions. Moreover, we will also…
View On WordPress
0 notes
Text
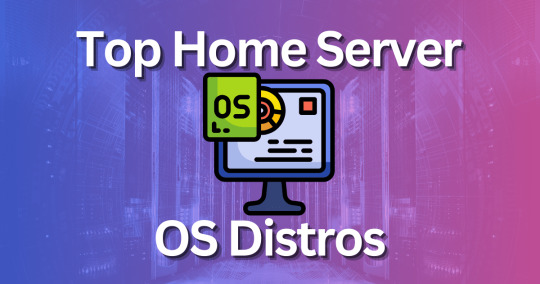
Top 5 Home Server OS distros for self-hosting
Top 5 Home Server OS solutions for self-hosting #homelab #selfhosted #homeserverOSrecommendations #besthomeserver2023 #CasaOSvsDietPicomparison #mediaserversetup #UmbrelOSfeatures #topserverOSforRaspberryPi #networkattachedstoragesolutions
Home servers and home server labs have exploded in popularity because users want to self-host and learn self-hosted services, keep control over their data, and just geek out overall. There is much interest in “home server OS” solutions that make installing and standing up self-hosted solutions easy. This guide discusses the top 5 home server operating systems you should check out. Table of…
View On WordPress
#best server operating systems 2023#CasaOS vs. DietPi comparison#home server OS recommendations#media server setup guides#network attached storage solutions#RAID configurations for servers#server OS for beginners and experts#stream media from home servers#top server OS for Raspberry Pi#UmbrelOS features
0 notes
Text


Raspberry Pi for Beginners (Mac+PC)
Testimonial from
Axel Lecturer)
I would like to introduce myself as a state-certified technical assistant for computer science with over 15 years of professional experience. Why is my Raspberry Pi for beginners video course interesting for you ?You will get easy to follow instructional videos, especially for Raspberry Pi starters and beginners, which let you start immediately with the Raspberry Pi. I teach the video lessons professionally and at a pleasant and comprehensible pace. It's like we're doing an on-site training session together.I am looking forward to welcome you in the members area soon!
0 notes
Text
🧑💻 It's here! The Metro 🚇 RP2350, expand with the 🎵 DAC7578 & FPC Breakout. And a fresh 🥧 update to the Raspberry Pi Beginner guide completes the new product tour this week! https://www.adafruit.com/new
#metro#rp2350#dac7578#fpcbreakout#raspberrypi#adafruit#electronics#maker#diy#opensource#hardware#innovation#tech#engineering#embedded#microcontroller#circuitpython#programming#robotics#iot#developmentboard#hackerspace#prototyping#hardwarehacking#electronicsprojects#makersgonnamake#techcommunity#diyelectronics
19 notes
·
View notes
Note
Hi! I'm so sorry if this has been asked before, but I'm completely clueless on computers, but I want to learn about them. Any places you'd recommend starting for bare bones beginners? I'm also interested in early-mid 90's tech particularly too. I'm guessing I have to figure out the basics before I can move onto specific tech though, right?
You're really knowledgeable and nice so I figured I'd just ask. Any help at all would be appreciated. Thank you! :]
That's an excellent question, I don't think I've been asked it before in such a general sense. I was raised with the benefit of being immersed in computers regularly, so providing a solid answer may be a bit difficult since for the basics, I never had to think about it.
I had computer classes of various types throughout my school years. We learned how to use a mouse, typing, word processing, programming -- and that was all before middle school. We got proper typing, html, and general purpose computer science courses in middle and high school, and you can bet I took those too. I also have the benefit of a bachelors of science in computer science, so you'll forgive me if my answer sounds incredibly skewed with 30+ years of bias.
The biggest suggestion I can give you is simply to find a device and play with it. Whatever you can get your hands on, even if its not that old, as long as it's considered past its prime, and nobody will get upset of you accidentally break something (physically or in software). Learning about things with computers in general tends to have some degree of trial and error, be it programming, administrating, or whatever -- try, learn, and start over if things don't work out as expected the first time. Professionals do it all the time (I know I do, and nobody's fired me for it yet).
Some cast-off 90s or early 00's surplus office desktop computer running Windows would be a good start, just explore it and its settings. Start digging into folders, see what's installed, see what works and more importantly what doesn't work right. Try to find comparable software, and install it. Even the basics like old copies of Microsoft Office, or whatever.
I recommend looking through the available software on winworld as it's an excellent treasure trove of operating systems, applications, games, and other useful software of the time period. I'd link it directly, but tumblr hates links to external sites and will bury this post if I do. If you're a mac fan, and you can find an old G3 or Performa, there is the Macintosh Garden's repository of software, but I'm not the right person to ask about that.
Some of you might be like "oh, oh! Raspberry Pi! say Raspberry Pi!" but I can't really recommend those as a starting point, even if they are cheap for an older model. Those require a bit of setup, and even the most common linux can be obtuse as hell for newcomers if you don't have someone to guide you.
If you don't have real hardware to muck about with, emulation is also your friend. DOSBox was my weapon of choice for a long time, but I think other things like 86Box have supplanted it. I have the luxury of the real hardware in most cases, so I haven't emulated much in the past decade. Tech Tangents on youtube has a new video explaining the subject well, I highly recommend it. There are plenty of other methods too, but most are far more sophisticated to get started with, if you ask me.
For getting a glimpse into the world of the 90s tech, if you haven't already discovered LGR on youtube, I've been watching his content for well over a decade now. He covers both the common and esoteric, both hardware and software, and is pretty honest about the whole thing, rather than caricaturish in his presentation style. It might be a good jumping off point to find proverbial rabbits to chase.
I guess the trick is to a find a specific thing you're really interested in, and then start following that thread, researching on wikipedia and finding old enthusiast websites to read through. I'm sure there are a few good books on more general history of 90s computing and the coming internet, but I'm not an avid reader of the genre. Flipping through tech magazines of the era (PC Magazine comes to mind, check archive dot org for that) can provide a good historical perspective. Watching old episodes of the Computer Chronicles (youtube or archive dot org) can provide this too, but it also had demonstrations and explanations of the emerging technologies as they happened.
There are so many approaches here, I'm sure I've missed some good suggestions though. I also realized I waffle a bit between the modern and vintage, but I find many computing troubleshooting skillsets transcend eras. What works now can apply to 10, 20, 30, or sometimes even 40+ years ago, because it's all about mindset of "this computer/program is dumb, and only follows the instructions its given" . Sometimes those instructions are poorly thought out on the part of the folks who designed them. And those failures are not necessarily your fault, so you gotta push through until you figure out how to do the thing you're trying to do. Reading the documentation you can find will only take you so far, sometimes things are just dumb, and experimentation (and failures) will teach you so much more about the hard and fast rules of computers than anything else. I'm rambling at this point...
So, let's throw the question to the crowd, and ask a few other folks in the Retrotech Crew.
@ms-dos5 @virescent-phosphor @teckheck @jhavard @techav @regretsretrotech @airconditionedcomputingnightmare @aperture-in-the-multiverse -- anything big I missed?
18 notes
·
View notes
Note
Hey sorry I saw your post about Linux being better/just as good as Windows for gaming PCs, and I was wondering which type you’d recommend downloading for a mid-tier PC? (I’m not super tech savvy tbh but I’m a fast learner and would rather download Linux at this point than Windows after all the shit it’s done lately). Also, did not know Android uses Linux that is cool!
If you're a beginner, either one of the Linux Mint flavours or one of the Ubuntu flavours, depending on how mid-tier we're talking about. Mint is based on Ubuntu but they're both ultimately based on Debian, which is the most stable and easy to use (in my experience) Distro. You'll find this a lot that a lot of distros are based on other distros, but if I were to talk about distros, the best ones tend to be debian based.
So Linux Mint is made to be as user friendly as possible and have most, if not everything, working out the box, and it's great, but it does use an older version of the Kernel so you need to bare that in mind (but as a beginner you don't need to worry too much, everything will still work). It comes in three versions: Cinnamon (using the Cinnamon desktop), MATE (using the Mate Desktop) and XFCE (using the xfce desktop). On a mid-tier PC any of these will work, even the heaviest of them has a recommended ram of 4GB but if you know your PC you might wanna try MATE (about 1GB ram recommended) or XFCE (512 MB).
However I would recommend Ubuntu (it's what I'm using rn). It's what Linux Mint is based on and is just as user friendly as Mint but with the big difference being it uses a newer Kernel version and has more flavors using different Desktop Environments and for different uses. The flavors however are on different websites but more or less work closely with Ubuntu itself.
Vanilla Ubuntu used Gnome as it's default which is okay, some people like it, but I don't and nor does a lot of my friends. Different flavors have different requirements and levels of usability but again, 4GB is enough to run any flavor. Other Flavors include:
Kubuntu: this is the one I use, and in my option it's better than Vanilla. It used KDE and it's suite of apps which are both user friendly, wide ranging and really nice looking. KDE is quite resource intensive (again that's not saying much compared to windows) but if you have a mid tier PC with more than 4GB ram, it should run fine and I recommend it. I'm a big KDE fangirl.
Xubuntu: This is one I used in the past. Xubuntu used XFCE which is designed to be lightweight without sacrificing functionality. It's not as flashy, but it's easy to use, functional, and great for lower-powered computers or just people who wanna save on computing power.
Ubuntu Cinnamon: This flavor uses Cinnamon (which the "main" version of Mint uses) but with Ubuntu as the distro. I used Cinnamon as my desktop when I used Mint and I loved it. It has all the functionality of Gnome with all the ease of use and flashiness of KDE, so if you try out Cinnamon on Mint but like Ubuntu, try it out.
Lubuntu: This is the lightest of Ubuntu flavors. It's light enough that it's ARM version can run on a Raspberry pi. This was designed for computers with not much power like those old netbooks (remember those?) and it's not as flashy or functional, but it's a good option if your computer is a potato.
Ubuntu Budgie: This is the one I know least about because I have never used budgie. I checked it out on distrosea but other than that all I know is from people who have tried it. Some like Budgie (which uses the Budgie desktop) some don't, but I think I might need to check it out before I pass judgement.
Each of these versions are distributed from their own websites so be sure to google.
As for gaming I would recommend that after installing it, if you have a separate graphics card, install the drivers either from the driver manager or from the website itself. Steam runs on Linux and follow the instructions from steam on how to activate Proton.
Happy nerding.
7 notes
·
View notes
Note
WARNING: LONG ASK INCOMING
For hobby electronics there’s two major kinds of processors: Microcomputers and Microcontrollers. Microcomputers are small full computer systems like the Raspberry Pi, they typically run a general-purpose OS (typically some flavor of Linux) and are useful for the kinds of projects that require basically a full computer to function, but not necessarily individual sensors. They’re a great place to start for people who don’t know a whole ton about programming or working with individual components because they typically can output a true GUI to a screen and have the capabilities of a regular desktop computer. They have a main processor, true RAM, and either large on-board storage space or a way to read a storage device, like an SD card.
Microcontrollers are less complicated (component wise) than microcomputers, but as a result are more difficult for total beginners to begin working with. They’re typically primarily a SoC (System on a Chip) processor without discrete RAM modules and a very small EEPROM (on-ship storage space) and need to have components wired and configured to them to be able to do much more than being a fancy calculator. They’re used for when you need something to carry out electronic functions or get sensor readings, but not necessarily a full operating system, so they’re best suited for small/integrated applications. Your helmet uses a microcontroller to control the LEDs you used in the Cunt Machine post.
I build high-power model rockets as a hobby and with my university team, so I work with both kinds of processor as part of designing payload systems. I typically prefer microcontrollers in these as most of what we do doesn’t need an actual OS to run, and they’re smaller/lighter than microcomputers. One of the advantages of a microcontroller is that it runs a Real-Time OS (RTOS) which forgoes all the user-friendliness of things like windows and linux to instead be the bare minimum backend necessary to run code uploaded into the processor.
The main advantage of using a microcontroller is really that they’re typically a lot cheaper than microcomputers are and are plenty powerful for really embedded applications. They also make other parts of whatever system is being built cheaper/easier to integrate because they require less overhead to function - the raspberry pi needs a minimum of 5 volts of power to work, while a chip like an ESP32-PICO can run at 1.8V.
The main way you make sensors/buttons/peripherals work with a microcontroller is via digital communication busses. There’s a few protocols, the most common being I2C, SPI, and UART. I’ll talk about I2C since that’s generally the most common. With I2C each component is assigned a 2-byte “address” that they’re identified by. When the controller sends a request signal on the I2C data bus, every sensor along the line will return their own signal, marked with their address so that they can be identified. It allows for a large number of devices to be put on the same lines and you can daisy-chain them through each other to the microcontroller.
I’ll be honest I really can’t think of a good way to say much more on the subject as like a starting message because I’ve been working with computers so long all the tech stuff for me is second nature, but if you have any questions ask away I can probably answer them or google them.
.
#AAAAAAAAAAAAAAAAAAAA TY INFORMATION#no yeah this is either really beginner friendly or. friendly to how much i have learned so far#tysm!!!! your insight is consistently so helpful <3#ask#lobsterbitches
27 notes
·
View notes
Text
Gear Up! A Beginner's Guide to Learning Robotics
Hey Tech Enthusiasts!
Are you fascinated by robots and want to dive into the world of robotics? Learning robotics can seem daunting, but with the right resources and mindset, you can get started!
Step 1: Understand the Basics
- Familiarize yourself with programming languages like C++, Python, or Java
- Learn about electronics, circuitry, and microcontrollers (e.g., Arduino, Raspberry Pi)
- Get a grasp on mechanical concepts (e.g., kinematics, dynamics)
Step 2: Choose Your Path
- Robotics kits (e.g., Lego Mindstorms, Makeblock)
- Online courses (e.g., Coursera, edX, Udemy)
- Books (e.g., "Robotics, Vision & Control" by Peter Corke)
- Join online communities (e.g., Reddit's r/robotics, r/learnprogramming)
*Step 3: Practice & Build*
- Start with simple projects (e.g., line follower, robotic arm)
- Experiment with sensors, actuators, and control systems
- Join robotics competitions or hackathons
Step 4: Network & Learn from Others
- Attend robotics conferences, meetups, or workshops
- Collaborate with fellow robotics enthusiasts
- Participate in online forums
Resources:
- Code.org's Robotics Course
- Robotics Academy
- Robot Operating System (ROS)
Inspiration:
- Boston Dynamics' robots
- NASA's Robotics Alliance Project
- Robot Wars
Conclusion:
Learning robotics takes time, patience, and dedication. Stay curious, persistent, and creative!
What's your favorite robotics project or resource? Share in the comments!
[Reblog if you're interested in robotics!]
3 notes
·
View notes
Video
youtube
Raspberry Pi 5 Firewall Setup Guide: Easy GUFW GUI Tutorial for Secure
🔐 Secure Your Raspberry Pi 5 with GUFW Firewall - Step-by-Step Tutorial Welcome to our comprehensive guide on setting up a firewall on your Raspberry Pi 5 using GUFW GUI. Whether you're a beginner or an experienced Pi user, this tutorial is designed to help you enhance your device's security with ease. What You'll Learn: ✅ Introduction to Firewalls and their importance ✅ Step-by-step instructions on installing GUFW on Raspberry Pi OS ✅ How to configure basic firewall rules ✅ Tips for maintaining firewall security Equipment Used: Raspberry Pi 5 Model B Raspberry Pi OS (Latest Version) Internet Connection Additional resources and links can be found below Useful Links: Official Raspberry Pi Website @raspberrypi @cybersecurityclub @Microsoft @YouTube https://www.raspberrypi.com/ 👍 Like this video if you found it helpful and subscribe to our channel for more Raspberry Pi tutorials and tips. Don't forget to hit the bell icon to get notified about our latest uploads! #RaspberryPi5 #FirewallSetup #GUFW #Cybersecurity #RaspberryPiTutorial #DIYNetworking
2 notes
·
View notes
Text
This is an awesome guide and I want to add a few of my personal choices to it and provide more resources.
Note: I am, by no means, an expert.
Disclaimer: Some of the suggestions below may be missing features you are used to. It's free, roll with it. 😎
Level 1:
Another browser extension you should know about is LibRedirect. With it, you can pass links over to alternative sites to view the content. Be aware that the majority of the alternative sites are run by volunteers and enthusiasts; they don't always work 🙁 Small note: The name "Libre" gets used a lot by privacy-respecting and open source alternatives where previously they might have used "Free" or "Open".
Level 2:
Adobe Alternatives DuckDuckGo uses Bing for results, I also use StartPage for Google results. There is a desktop app for watching Youtube content called FreeTube that I recommend. It's a front-end for YouTube and Invidious servers (which re-stream YouTube content).
Level 3:
AdGuard is fine but if you are setting up a Raspberry Pi anyway, consider Pi-hole as an alternative option.
Level 4:
If, for some strange reason, you disregard the above guide and think that putting AdGuard on your phone is a reasonable alternative to the suggestions here, I would suggest that you DON'T. It may be different now but when I tried it the Android app it asked me to install a certificate. It does this so that it can modify websites you visit to block more ads. The downside is that it also allows them to read everything that would normally be encrypted. They may not be doing anything nefarious with it, but it's a risk I'm not taking. So, if a third-party you don't trust asks you to install a certificate, DON'T.
Level 5:
Awesome Piracy If you don't want to sign up for usenet and prefer to use torrents, get a good VPN and lock the torrent client down to only use the VPN connection. There are torrent tests you can do to see if your IP is exposed. In your VPN client, pick a country where copyright isn't a word! 😉
Level 6:
In addition to ReVanced, I want to also promote the app NewPipe which can be downloaded from the F-Droid store. F-Droid is an app store for your Android phone that hosts open-source apps and tells you every dirty detail of what each app does, privacy-wise. NewPipe is a YouTube alternative/Invidious front-end for Android.
Level 7:
Custom Windows playbooks are awesome and while I don't know Revi very well, but I will definitely check it out! Just browsing the docs I noticed that they default to the Brave browser. This is a personal opinion but I don't trust Brave as much as open-source alternatives. They have tried some interesting attempts at monetization in the past that make me suspect. Use the browser you are comfortable with instead and use a well-known, good adblock like uBlock Origin or uBlock Origin Lite. In addition to Firefox and its derivatives there is also Chromium and Ungoogled-Chromium if you want something familiar to Chrome.
Level 8:
Seriously, use Linux if you can (and if you do, make backups of your important files first!). Ignore Linux users that tell you to use Arch or an Arch derivative, it's not for beginners. When stuff breaks you just have to figure it out. Ubuntu, Mint, and Pop! are great for beginners but if you play games they may not be the most up-to-date for that. (Pop is especially behind at the moment 😭 but I'm hoping that changes soon) I personally use Fedora which is also great for beginners, is very up-to-date, and never gives me problems. However it does require one post-install setup step to replace the media codecs with "non-free" ones to make some media playback situations work. Other than that, it works so well that I actually find it boring compared to the usual amount of tinkering I'm used to! Fedora has two notable derivatives: Nobara, which is slightly tweaked for improved gaming performance and includes the media tweaks, and Bazzite which is similar to SteamOS but for general hardware (it's for gaming-specific setups like handhelds and living room gaming where you need a controller-focused interface).
Level ???:
You can host your own websites (webapps) made by others! I fell down this rabbit hole after Google killed Reader and I found self-hosted RSS alternatives. Later, I set up Docker and now I run dozens of useful webapps for all sorts of things! Try stuff out!
Hopefully this is helpful to someone. Feel free to ask me general questions about any of the above. If you have setup questions or technical issues, please contact the creators of the above projects first, as I can't cover everything everywhere. I try to, though! 😂
In case anyone is curious, I'm a software developer (mostly in web development) with a lot of general IT skills and troubleshooting experience and I spend a lot of my time tinkering with Linux, FreeBSD, self-hosted apps, open-source software, and supporting Windows systems that are all over the place. I have experience going back to MS-DOS, using Linux since the late 90's and have been running Linux as my primary system for over 5 years now (since Valve released Proton).
Thanks for reading!
genuinely wild to me when I go to someone's house and we watch TV or listen to music or something and there are ads. I haven't seen an ad in my home since 2005. what do you mean you haven't set up multiple layers of digital infrastructure to banish corporate messaging to oblivion before it manifests? listen, this is important. this is the 21st century version of carving sigils on the wall to deny entry to demons or wearing bells to ward off the Unseelie. come on give me your router admin password and I'll show you how to cast a protective spell of Get Thee Tae Fuck, Capital
#open source#microsoft windows#linux#self hosted#software#computing#if buying isn't owning then piracy isn't stealing#support small creators whenever possible
67K notes
·
View notes
Text
How to Setup Robotics Lab in School – A Complete Guide to Establishing a Robotics Lab
In today’s technology-driven world, robotics education acts as an important asset in equipping students with 21st-century Robotics & AI skills such as critical thinking, problem-solving, and creativity. Robotics lab offers a dedicated space for students to engage in hands-on learning, exploring engineering, machine learning, and artificial intelligence (AI). By providing a well-structured Robotics & AI lab, schools generate our young learner’s interest in the field of STEM (Science, Technology, Engineering, and Mathematics), and make them ready for future careers in further Robotics & AI embedded technology. This will guide our learners in a direct approach to setting up a Robotics lab, and also ensure that students gain maximum educational benefits from this modern learning environment.
Defining Objectives and Goals
At the foundational stage of setting up Robotics & AI labs in schools, it is essential to clearly define the lab’s objectives and purpose. This helps schools determine whether the focus will be on basic robotics education, competition-driven learning, or innovation through patent-worthy projects. The primary goals include introducing our young learners to Robotics and AI, upgrading with programming and engineering skills, and preparing students for national and international tech. Competitions, and encourage them to become future innovators by learning the combination of innovative projects that combine balanced learning. These objectives will guide schools in planning the necessary resources such as designed curriculum and selecting appropriate equipment while learning the concept in Robotics & AI labs.
Securing Budget and Funding
Setting up robotics labs in schools involves a significant financial investment, and schools must plan their budgets accordingly. Several funding options are available in the authority, including school budget administration, government permits, corporate partnerships and sponsorship, and community fundraising initiatives. STEM education companies collaborate with the government for support with the education part and the material requirements according to the school for opening robotics & AI Labs in the school. At the same time, STEM education companies also offer sponsorship under several projects, provide teachers training programs by the STEM education companies, and Atal tinkering Labs handled by the robotics lab. CSR approach and alumni contributions can also give financial assistance.
Selecting the Right Space
Whenever a lab is established in a school, it is essential to carefully select a suitable space. Choosing the right location for the Robotics and AI lab is crucial to ensuring a practical, engaging, and productive learning environment. The lab should be spacious enough to have workstations, practical testing areas, robotics kits, and tool storage. It must also have proper ventilation, lighting, electrical connection, and internet connectivity. A well-setup layout with designated areas for programming, assembly, and testing enhances productivity and safety.
Procuring Robotics Kits and Equipment
Robotics Lab Selecting the right robotics kits and equipment is fundamental for creating an effective robotics lab. The selection of kits should be based on the learners’ age groups and their initial skill levels. For beginners, kits such as mechanical construction kits and block-based power screw kits are ideal. In terms of coding, platforms like Scratch and Code Blocks provide a built-in introduction to robotics and programming. Intermediate classes from 6th to 8th can benefit from Arduino, Raspberry Pi, and other robotics kits, which provide hands-on experience in coding and electronics technology. Students at the senior level can explore AI-powered coding platforms like AI Connect, Drone technology, and IoT-based machine learning projects. With all of this, the Robotics & AI lab will support various robotics innovations going to happen in the future.
Developing a Robotics Curriculum
A well-organized robotics curriculum ensures progressive growth in learning and development of new advanced skills. Schools should design the curriculum in such a way that it will cover all concepts from beginner to advanced levels, hands-on projects, and advanced robotics applications. In the beginner level from class 3rd to 5th class, learners will focus on basic robotics, easy-to-understand programming concepts, and understandable mechanical design. Then at the intermediate level for 6th to 8th class learners should focus on microcontrollers, robotics, and Machine learning robot programming. Later on at the advanced level, it should include AI, machine learning, IoT embedded, and participation in robotics competitions which motivates the students to do more innovation in the future.
Hiring Skilled Educators and Mentors
After setting up the lab, the most crucial person is the one who will run it – the ideal role model and mentor. This individual will guide our future learners towards a bright future, equipped with up-to-date knowledge in advanced technology and artificial intelligence. Our STEM companies provide STEM-certified educators, who are the best mentors to help students grasp the concepts of robotics and AI in an engaging and enjoyable way. They are essential for guiding students in this specific direction of gaining knowledge in robotics and AI. As per our advice, schools should recruit STEM-certified educators with expertise in all directions where they should be experts in their fields of Science, Technology, Engineering & Mathematics.
Robotics Lab in School Following that, it is important to establish collaborations with university researchers, industry professionals, and robotics organizations to provide students with valuable insights, real-world exposure, and expert mentorship. If some schools want to train their teachers for this subject, then our STEM education companies provide teachers training programs and organize workshops for the teachers to ensure that instructors remain updated with the latest technology in robotics technology. This also encourages students to a learning approach, where senior students can also mentor in the class and it also enhances engagement and knowledge-sharing skills.
Implementing Safety Measures
In the Robotics & AI lab, we need to ensure that we have proper safety for the students in the robotics lab. It is essential to establish clear guidelines on the Circular Board for handling electronic components and computer systems provided in the lab. Additionally, students must be trained in basic first aid procedures to ensure they are prepared to respond effectively in case of any mishap, emphasizing the importance of safety and preparedness in a lab environment. The essential safety measures include protective gear such as gloves and safety goggles, building fire safety protocols, and training students for first aid. These properly structured lab sessions with instructor supervision help to maintain a safe environment in the lab.
Conclusion
In conclusion, establishing Robotics & AI labs in schools marks a progressive leap in advancing STEM education and preparing students for a tech-driven future. A well-designed and thoughtfully planned lab—with clear objectives, suitable equipment, expert mentorship, and a structured curriculum for all grades—creates an engaging, future-ready learning environment. Getting educated about Robotics & AI education develops technical skills and also enhances creativity, teamwork, and critical thinking approach toward the problem and its solution. By continuously approaching & upgrading resources such as curriculum and student participation in the competition, schools can work hard to motivate the upcoming generation of young innovators and engineers who are ready to lead the vision of future innovators.
0 notes
Text
Getting Started with Coding and Robotics: A Beginner's Guide
In a world driven by technology, coding and robotics have become essential skills for the innovators of tomorrow. Whether you're a student, a parent looking to introduce your child to STEM, or a curious beginner, diving into this field can be both exciting and a bit overwhelming. This guide is here to help you take the first confident steps into the world of coding and robotics.
What is Coding and Robotics?
Coding is the process of writing instructions that a computer can understand. It's the language behind websites, apps, and yes, robots. Robotics involves designing, building, and programming robots that can perform tasks either autonomously or through human control.
Together, coding and robotics form a dynamic combination that helps learners see the immediate results of their code in the real world.
Why Learn Coding and Robotics?
Promotes Problem Solving: Kids and adults alike learn to break down problems and think logically.
Builds Creativity: Designing a robot or coding a game encourages imaginative thinking.
Future-Ready Skill: As automation and AI grow, these skills are becoming essential.
Hands-On Learning: It’s engaging, interactive, and incredibly rewarding to see your code come to life in a robot.
Tools to Get Started
Here are some beginner-friendly tools and platforms:
For Younger Learners (Ages 6–10):
Scratch: A visual programming language where kids can drag and drop blocks to create games and animations.
Bee-Bot or Botley: Simple robots that teach basic coding through play.
For Middle Schoolers (Ages 10–14):
mBlock or Tynker: Easy-to-use platforms that introduce Python and block-based coding.
LEGO Mindstorms or Quarky: Kits for building and coding robots.
For Teens and Adults:
Arduino: An open-source electronics platform ideal for building custom robots and gadgets.
Raspberry Pi: A small, affordable computer perfect for learning to code and building digital projects.
Python: A powerful yet beginner-friendly programming language widely used in robotics.
Simple Project Ideas to Begin With
Blinking LED with Arduino: A classic beginner project to learn hardware and coding.
Line-Following Robot: Build a robot that follows a black line on the floor.
Scratch Maze Game: Create an interactive maze using block-based coding.
Smart Light System: Program a light to turn on based on motion detection.
Learning Resources
Online Platforms: Code.org, Khan Academy, TinkerCAD Circuits, STEMpedia.
YouTube Channels: STEMpedia, TechZone, FreeCodeCamp.
Books: "Coding for Kids" by Adrienne B. Tacke, "Adventures in Raspberry Pi" by Carrie Anne Philbin.
Local Classes: Check for nearby coding and robotics centers or STEM workshops.
Tips for Beginners
Start Small: Choose one tool or platform and explore it fully before moving on.
Be Curious: Don’t be afraid to experiment and fail—that’s how you learn.
Join a Community: Forums, clubs, or online groups offer support and inspiration.
Build Projects: Apply what you learn through simple, real-world applications.
Have Fun: Learning should be exciting. Choose projects that interest you.
1 note
·
View note
Text
PiMiga4 by Chris Edwards - How to install
Here is a cleaned-up and step-by-step guide for using the **PiMiga** image, based on the original notes by **Dr. Chris Edwards**, a well-known Amiga enthusiast and YouTuber. This version provides clear instructions for beginners while keeping the original project goals intact. — 🔧 How to Install and Use PiMiga **A modern Amiga experience on Raspberry Pi 4/400 or PC** — ## 📘 Introduction **What…
0 notes
Text
Raspberry Pi cold miner bccmining.com
Raspberry Pi cold miner bccmining.com is an innovative approach for enthusiasts looking to delve into the world of cryptocurrency mining with minimal investment. Utilizing a Raspberry Pi, a low-cost single-board computer, miners can set up a cold mining rig that operates efficiently and discreetly. This method is particularly advantageous for those who wish to mine cryptocurrencies without the high power consumption and noise associated with traditional mining setups.
At https://bccmining.com, you can find comprehensive guides and resources tailored for Raspberry Pi cold miners. The platform offers step-by-step instructions on how to configure your Raspberry Pi for optimal mining performance. Additionally, bccmining.com provides insights into selecting the most profitable cryptocurrencies to mine using this setup, ensuring that users can maximize their returns.
One of the key benefits of using a Raspberry Pi for cold mining is its energy efficiency. Unlike high-powered GPUs or ASICs, a Raspberry Pi consumes very little electricity, making it an eco-friendly option for mining. Furthermore, its compact size allows for flexible placement, whether at home or in a small office space.
For beginners, bccmining.com also hosts a community forum where users can exchange tips, troubleshoot issues, and share their mining experiences. This supportive environment fosters learning and collaboration, helping new miners navigate the complexities of the crypto world.
In conclusion, if you're interested in exploring cryptocurrency mining with a low barrier to entry, consider setting up a Raspberry Pi cold miner. Visit https://bccmining.com to access all the tools and information you need to get started on your mining journey. With its user-friendly approach and efficient performance, Raspberry Pi cold mining could be the perfect fit for your crypto aspirations.
bccmining.com

BCC Mining
BCCMining
0 notes